Wednesday, January 28, 2009

Small Scrap Storage


Over at Scrap Witch, Josie Dean has issued a Use Your Stash challenge involving that gigantic box of small scraps we all have. She wanted us to sort, and organize our stash so it was accessable and easy to use, not to mention neat. Here is my effort:

I got these stackable bins for $1 each at Dollarama. I have sorted PP and cardstock by colour and made a bin for each colour. Black, white, and grey are together. This is the same system I use for my 12x12 shelf. I was hoping for something a little bigger, but these will work just nicely for any thing in the 6x9 range or smaller. All of my bigger scraps are in one large bin together and I save them for card making and 12x12 layouts.

I like the fact that I can now reach all of my scraps easily from my chair and can easily unstack the bins if I need to really search for something special. Originally I had them all in one large basket and was easily frustrated while searching for a specific print or colour. This should work out much better. Thanks Josie, and yes.... I will take the stickers off of the backs of the bins.... someday.

Saturday, January 24, 2009

Organization - An Evolving Process

Over the next few days I will share my organization secrets that I have learned over the past year.


First - Paper Storage. If you are a 12 x 12 scrapper like I am, the first thing you'll discover is that finding storage for 12 x 12 is neither easy, or cheap. A friend advised me to build one (and helped, thank god).

This shelf to the left was built from white malomine board purchased from home depot. I managed to get one that had pre-drilled holes in the sides for the shelves at small intervals that would allow me to adjust the shelf height. I also purchased the little plastic shelf supports from home depot. The individual shelves are 13 inches wide and the sides are 4ft. You can build to suit your needs though, which is the best thing about this shelf. The sides were cut and screwed to the top, the shelf supports put in, and the shelves snapped into place all in about 2 hrs. Beware though... it weighs a ton! I use it to separate my paper by colour. I put my cardstock in with my PP for simplicity. I've had this same system for a long time and it seems to work great!

Total Cost of Shelf:
Malamine board (2, 1 with predrilled holes) $30
Shelf supports - $.05 each = $3.00
Total $33
Compare to pre-built cost of $140 - $299 and what's not to like?

My other storage shelf was purchased from Canadian Tire. I no longer have the facilities or the tools to build my own since moving. This shelf is adapatable to your design. There are more vertical and horizontal shelves that I could add, but I like having space for my various baskets. You could also use this model for a paper storage shelf, but since I already have one, took advantage of the shelves other features. The drawers are lovely. In the shallow drawers I have my letter stickers, finished cards, and my embossing powders. In the deep drawers I have my ribbons, flowers, buttons ( yes, I need a whole drawer.. see previous post), and my larger print photo's and photo cd's. I purchased this shelf for approx $150. The assembly was time consuming and a little trying - but since I made Jeff do it there wasn't much frustration on my part!


Thursday, January 22, 2009

My Favourite Layout for Mulitple Photo's


This is one of my favourite LO's created from a sketch originally done by Penny Hackney over at Scissor's Paper Pen! (There is a link to her blog on the left hand side of Scrap Stash). Her LO was featured in the Blog over at Scrap Witch a few months back. A few of us have had a go at it. Marineland was my first attempt, but I've also tried it in black...


The photo's are 3x3. I think it is just such an effective LO, and so easy! Big thanks to Penny for inspiring me, and a big thanks to Jill over at Scrap Witch for featuring it in her blog so I could find it! If you have a moment, head on over to scrapwitch to check out Penny and Jill's version.

Monday, January 19, 2009

Beautiful Buttons

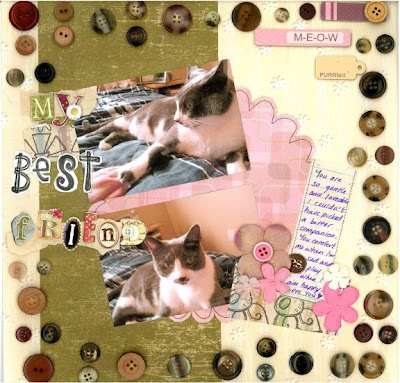
Ok. I'll admit it... I am a self-proclaimed button addict. I love the different shapes, colours, textures... and of course the price! I first discovered buttons on a sketch challenge for Scrap Witch last year (sorry ladies, I can't remember which one). I cut them off of an old shirt (ok, maybe not so old... but I'm sure it wasn't missed...), and was completely happy with the way they worked. I then found a small stash at the dollar store, but quickly graduated to the wide, wonderful world of EBAY. At which time I suffered from temporary insanity and went a little crazy with my bidding ending up with about 10lbs of buttons!

Primarily I use buttons for flower centers (easier and faster than using brads), and sometimes I make the entire flower out of buttons. Lately I've become addicted to using them for borders... even if it is a little over the top sometimes...


This is the sketch challenge for January at Scrap Witch... well, it started out being the sketch challenge anyway... now it resembles ATTACK OF THE BUTTONS. I can't help it, they are so versatile! As an after thought, I wish I had of made my title a little more distinctive, but I like the cut and paste look.

Speaking of buttons, anyone interested in a swap?

Tuesday, January 13, 2009

Trend Watch - Argyle and Houndstooth


I have been noticing most companies have been coming out with argyle and houndstooth patterns lately. I love most patterns... I couldn't live without stripes and polka dots. But something about these patterns makes me turn up my nose... (although... I do absolutely LOVE the colours in the argyle paper to the left). I just can't picture myself using it. What about you, have you added some to your stash yet? Or even better... can you provide us with an example? Either yours or someone elses. I'm very curious to see it put to good use. You can email your example to jewels.scrapstash@gmail.com.

Monday, January 12, 2009

Saving the best for last

I've caught myself saving certain papers for that really "special" LO. Like they are all not special to me! Jeez! So. Now I have all of these beautiful papers that I could have been using all along, instead of allowing them to collect dust on my shelf. Some of my most favourite stickers, embbies, and tags have gone un-used because I'm afraid to "waste" them. Instead of "saving" my most precious items I will now use what works and looks best to make every LO special. Hoarding doesn't do anyone any good... especially me!

Do you hoard your favourite supplies?

Thursday, January 8, 2009

The all important Black Journalling Pen!


If you are like me and prefer to use your own hand writing rather than computer font, then you need a good sturdy pen. I also do an enormous amount of doodling. There are so many kinds on the market, it's difficult to know what to choose. Most cropping stores will let you try before you buy, so take advantage if you can.

Things to look for in good marker or pen:

The SMEAR factor: Does it smear when you touch it with your fingers?

How long does it take to dry? I'm an impatient scrapper and end up ruining things because I can't wait for slow pigments to set.

Does it run if there is dampness or water? Not that your pages should be getting wet anyway, but if you sometimes use acrylics and you want to paint overtop of your ink, you need to ensure your pen won't run.

Cost: Don't cheap out. This is an essential.

Writing Materials: Will it write on different makes of paper, vellum, cardstock, foil, photo's, ect?

My current favourite is made by Memory Makers. However, I've found an interesting link which has descriptions and uses for many different manufacturer's and styles.
Check it out---->
http://http//www.scrapbookscrapbook.com/scrapbooking-pens.html

Wednesday, January 7, 2009

Keep It Simple

Sometimes simple is better. Some of my most effective layouts are ones with little or no embellishments. When your page is too overwhelming, the message is sometimes lost and the eye does not know where to look. Try looking away from your page and then look back. What is your eye drawn to first? Your embellishments should compliment your page, not overwhelm it.