This horrid photo doesn't really pick up the oranges, but yo get the idea. The title is Wanna Be Cowgirl. Based on a design from Scrapbooks ECT by Erin Clarkson.
We all have it... craft paper, left over packaging that we thought we might use, weird bits of leftover chipboard. Well, it's time to USE IT OR LOSE IT! I think this LO is much more effective on craft paper than it would be on plain old white. What do you think, try your own LO on craft paper and lets see it!
I have no idea where most of these papers are from. I don't sort by designer so everything is just all mashed in together. If you want to know about a product, I could probably find the origin if I looked hard enough. Leave a comment if you're curious. The stars are a cuttlebug die, and also the font in "wanna be". The blue sticker letters are CM (sent by Amy, thank-you very much!).
This is yet another scrapwitch challenge (I have a lot to catch up on!). This is my cousin Jenny when she was about 3 I think. Isn't she cute? This is a Penny sketch.
I've stolen my mothers photo albums! These are some pics of yours truely, at about 1yr. To ease myself back into scrapping (I've been gone for sometime, moving ect), I've tackled one of Mistra's SBS's over at Scrapwitch. Go take a look if you have a moment!
Create a fun LO using only patterned paper for your embellishment. You can either make embellishments out of PP or use multiple patterns and colours to create interest on your LO. Here is a quick example:
Of course, my scanner has yet again washed out the beautiful tones of the paper, and given me red face, but you get the idea. All of these were scraps pulled from my stash. I didn't have to cut up even one new piece to complete this LO, and it was super-quick to finish!
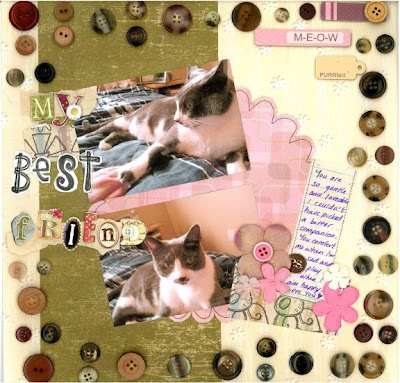
Yet another random LO of the kitties. I did this one up quickly last night. I finally got to use up some of my kitty stickers, ( I have WAY too many). Time: Approx 25min
These are colours that I would have never used together in a million years. I'm quite proud of myself. On my continuing mission to eliminate a huge portion of my accumulated scrap pile, I developed a new process. I picked my background PP and then reached in blindly to my pile of large scraps ( the ones that are still 12" on one side are in a separate pile for easy access), and pulled out a piece of mystery paper.... the turquoise one with the white dots. It's difficult to tell on my photo, but the back ground PP is made up of tiny little dots for texture. So now I had a micro-pattern, and a smallish pattern. I looked through my neutral small scraps (I keep all my grey, black, and white scraps in the same container), to find a medium sized PP. The navy cardstock border was added to create some structure. I found the Queens & Co letters to pick up the polka dot pattern on the PP which was in a neutral colour to balance out the punch of colour from the all that turquoise. The letters also pull in the silver/grey from little fins shirt in the photo. Overall, I can't beleive the results and will keep this colour pallete on file for future boy LO's. The embellishment in the top left corner was found completely by accident when I was looking for something else. I've had it for ages! I added the buttons for some texture, and the doodling because... well lets face it... I LOVE doodling. It also picks up the doodled appearance of my medium PP. I decided to take a risk and journal directly on my background PP, how brave am I?
This was an SBS challenge over at SW put together by the lovely Mistra! Another of Mistra's SBS challenges. Loads of fun. This one I made up. I LOVE LOVE LOVE the background PP. It was part of my "splurge" from the sale over at Mad Scraps. IRL the red paper with the journalling is actually orange. Not sure why the scanner didn't pick it up. Wierd.
Buttons don't have to be just buttons. You can make them into anything you want! Here I've used them to represent leaves on my trees, and on the ground. Thinking back I probably should have used some PP for grass, but that didn't occur to me until I was finished. This quick and easy LO took about 30min.
Time for another sketch idea! I used this sketch to make a LO of my dad, which I will post later, (I don't have it with me atm). I cut out a random shape from PP and use it for my background. A simple easy sketch that should take you less tha 45min. If you give it a go, email your completed LO to: jewels.scrapstash@gmail.com. I'll post it on Scrap Stash and send you a small RAK for playing :).
I've been following Mistra's blog and have fallen for the challenge she is working on for the year of 2009. 52Q, by *e*, takes place once a week. Each week *e* will post a new question to scrap and journal. Here are my first two attempts:
52Q#1 - What are your wishes for this year? 52Q #2 - Are you afraid of change?
I don't plan on spending too much time on this project, I like the idea of being able to complete something quickly... at least SOMETHING will get done. I did both of these in about an hour from beginning to end. Most of that time was spent messing around with my cuttlebug. Some of the completed tags are posted on *e*'s blog. You should definitely take the time to check it out. Some of them are absolutely stunning. Mistra has a couple on her blog too that are way cool. She's so talented!
YAY! My new stuff has arrived! I ordered this last week from MAD SCRAPS. Unfortunately, Mistra is closing up shop, but it's a great time to catch some deals if you're looking... and of course we're always looking for cheap stash! Here's what I got:
about 50 sheets of new PP. Most is heavy duty-double sided from various designers
new chipboard letters in 3 different sizes
shipping tags, which I plan to use on the 52 tag challenge that's featured on Mistra's blog (for more information, head on over.. there is a link on the LH side of my blog)
A variety pack of chipboard tags
A beautiful new acrylic album. SO EXCITED.
Needless to say, I'll be heading home tonight to check out my new stuff.
Today I want to showcase some of my friend Morgan's work. She has a unique style all her own, and I am simply envious of her ability to mix colour to make her photo's pop. Morgan and I get together about once a month to scrap and share ideas and stash. We have taken a break since Christmas, but I'm looking forward to our next scrapping night in March. These layouts are from her 'Catalina' album. Beautiful work Morgan!
I had an idea for a sketch today and thought I would share. I think I'll make this a weekly addition to Scrap Stash. If you would like to give it a try, email your results and I'll post it. If we get a few participants, I'll throw in a small RAK as a prize.
I don't often get to use my super-intense-bright letters and cardstock. I love bright colours, and I love the way they look together, but sometimes it's hard to use them without taking away from your photo's and journaling. Because my photo's were on the weak side, I chose to take advantage and go crazy with my other feautres and have some fun. I'm happy with the result... I got to scrap one of my favourite places, and use all of my fun stuff too. This is one of the challenges in We Dare You if you've managed to get hold of a copy, check it out.
Melissa over at Snip, Snap, Crop has photo tagged me! My challenge is to post the 6th picture in the 6th album of my photo stash. So here it is...
This was a random photo taken in NOV 2007 in the early morning during a snow storm. I remember because it was the first big storm we had. I've moved since I took this, it's the view from the side door of my old house.
Now my job is to choose 6 more people to challenge: So I choose:
Can't find the right pattered paper? Make your own! I took a plain pc of green paper and wrote the lyrics to Oh Christmas Tree. I've used my own hand writing three times on this LO: The title, which is embossed with Tim Holtz distressed powder in 'Walnut'. The background PP, and the journalling. I like to use my own handwriting whenever possible. It makes it more personal, I think.
If you're looking for a good challenge book, I highly recommend We Dare You by Kristina Contes, Meghan Heath Dymock, Genevieve Simmonds, and Nisa Fiin. It challenges you to scrap the good, the bad, and the ugly. It's a subject based book, rather than a sketch challenge. I find their ideas refreshing and unique. I have tried three so far with amazing results. They also have some great techniques that will inspire you to stretch your scrapping wings. Cost: $20 CAD. But who can really put a price on inspiration? I plan to try all of the We Dare You challenges.
When I first pulled out this photo, I had NO idea what to do with it. I tried various papers, pink to match the dress, red for the flowers, grey (too depressing), no luck. Finally, I decided that the paper I used didn't necessarily have to match the photo. I looked at the photo and thought of my Grandparents. My grandmother loved all things floral. She loved printed wall paper, and big prints. I remembered I had a vintage scrap pad collection that was collecting dust at the back of my shelf. I have rarely used it. Vintage is not usually my thing. I flipped through the papers and found a lovely robin's egg blue. 'There is no blue in my photo!' I thought, but it just felt right. I selected the other PP from the same collection because it reminded me of the duvet cover that was on my grandparents bed for as long as I can remember. I chose flowers and embellishments that matched the paper and I was off! The journaling came easy for once. I don't think I did any editing at all.
So. What is the moral of this story you ask? You don't have to choose paper that matches the colours in your photo. Try concentrating on what the photo makes you feel and go from there. I guarentee you it will be much more personal and meaningful when you're finished.
Here is a copy of my journaling. It's tricky to ready in the photo.
My Grandmother and Grandfather played a huge role in my life.They were the center of my world for my entire childhood.I can’t even imagine the person I would be without their influence.There was a hole in my heart when we lost my Grandpa to lung cancer, and then my Grandma a few years later to a heart attack.Life without them has much less colour.
We called my Grandmother “Ma”.Mostly because that’s what her children called her, and when she adopted my cousin Jason he called her Ma as well.It stuck.I don’t think I ever called her “Grandma”, unless talking about her to someone else.On weekends she would pick me up and we would go into town to shop.She would always buy me some small trinket and we would have lunch in a diner (and of course, pie!), then journey home.In the afternoons I would watch cartoons with Grandpa while he did his puzzles.His favourite was the Bugs Bunny and Tweety show, but he would never admit it.I think he just used me as an excuse to watch it.Ma would be in the kitchen getting things ready for supper.The meals I remember the most were side pork and fried potatoes, and a completely wonderful thing she called Goop.Goop consisted of spring vegetables, and new potatoes from the garden all mixed together in a wonderful white crème sauce.There was always desert.If she hadn’t baked anything special my Grandpa would pour the supper tea into two saucers, add brown sugar, and we would dunk homemade bread in it.It was wonderful.Sometimes we would dunk the bread in fresh maple syrup.
Wednesday was bread day.Ma would get up early, (ok, she ALWAYS got up early), and start making the bread dough early in the morning.My Grandpa would not eat store bought bread.It had to be homemade.Ma would use the leftover bread dough to fry scones and get a dish of strawberry jam for me to dip in.I cannot even describe the flavour.To this day I cannot find one as good.Eventually she got a bread maker and her Wednesday traditions stopped, but I can still remember the smell of the bread baking.Sometimes when I wake up in the middle of the night I can smell it and it is almost as if I’m back in the yellow sided house in Cordova.
When I was very small, my grandparents lived in Hamilton, and they had a cottage in Cordova next to my Great Uncle Gerald.When my Grandpa retired from Westinghouse, they fixed the cottage and winterized it into their permanent home.Just down from the “cottage” was DeerRiver.Over DeerRiver was the green bridge that allowed the traffic to pass from one side to the other.This is where we would swim for days on end.I don’t think we got out of the water except to eat.Entire summers were spent in my bathing suit with pruney skin.This was the ideal way to grow up I think.
Now that they have passed, I hope they are together and that there is a yellow sided house on a river with a green bridge in heaven. I know that is where I want to be when my time comes.
Scrapping is about 1 basic thing: Recording our memories. Sometimes it's easy to get lost in making things pretty, or trying the latest new trend. All we really need is a photo and a pen. Tell your story.... that's what's important.
I try to save the programs for all of the shows we see. I like to pull bits and pieces out of them to use on my pages. For this LO, I didn't have many photos, but too much for just one page, so I did a double layout. I wanted to pull everything together a little closer to the center to make it look "fuller". By layering the cardstock I created simple borders for a nice quick "blocked" look. I kept them off center because everything just looked too "report-like" when I had them straight. Nice terminology I have eh? <---- for all of you non-canadians, that is the proper way to use the typical Canadian "eh" in a sentence. We don't actually say it everyother word (well, unless you're an east coaster eh?).
This is a LO I did the other day which turned out to be very similar to one of Elsies 52 challenges. I didn't plan it that way, but whatever works! This is the first time I've used acrylic paint on a LO. I painted around the photo and also created the number 10. I'm very pleased with the results and will definitely try it again. This was an easy and quick LO but something to treasure. Sometimes we don't say the important things enough.
This is a spice rack I had lying around that I wasn't using, (I'm not exactly the world's greatest chef). I had so many different kinds of brads and small metal embellishments, that I was getting frustrated with just keeping them in a box. This is just a cheap spice rack, I think it retails somewhere around $12. I love it.
It's a two for one post day. Please ignore the horrid photography skills for this pic... the lighting in my basement is very sad.
This is my current collection of chipboard letters... well, the ones I've opened anyway. Like buttons, I love chipboard for it's texture and ease of use. I lose paitence with cutting out letters all the time, so this is a simple solution. Each set is placed in a baggie and pinned to my corkboard. Not a very elegant solutions, but cheap. These are all things which I had around the house. I'm still looking for a new plan, but this will do for now.
I love buttons. I love buttons so much, that I separate them by colour and store them in clear containers for easy access. Sadly, this is only part of my collection. Once a month or so I grab a couple of handfuls out of the giant bag I have still to sort, and put them away.
These containers are stackable (they just twist on to each other). I purchased them from dollarama (isn't that the best store?), they come 6 in a package - for 1$. You can also purchase a smaller size for brads and tiny beads.
Over at Scrap Witch, Josie Dean has issued a Use Your Stash challenge involving that gigantic box of small scraps we all have. She wanted us to sort, and organize our stash so it was accessable and easy to use, not to mention neat. Here is my effort:
I got these stackable bins for $1 each at Dollarama. I have sorted PP and cardstock by colour and made a bin for each colour. Black, white, and grey are together. This is the same system I use for my 12x12 shelf. I was hoping for something a little bigger, but these will work just nicely for any thing in the 6x9 range or smaller. All of my bigger scraps are in one large bin together and I save them for card making and 12x12 layouts.
I like the fact that I can now reach all of my scraps easily from my chair and can easily unstack the bins if I need to really search for something special. Originally I had them all in one large basket and was easily frustrated while searching for a specific print or colour. This should work out much better. Thanks Josie, and yes.... I will take the stickers off of the backs of the bins.... someday.
Over the next few days I will share my organization secrets that I have learned over the past year.
First - Paper Storage. If you are a 12 x 12 scrapper like I am, the first thing you'll discover is that finding storage for 12 x 12 is neither easy, or cheap. A friend advised me to build one (and helped, thank god).
This shelf to the left was built from white malomine board purchased from home depot. I managed to get one that had pre-drilled holes in the sides for the shelves at small intervals that would allow me to adjust the shelf height. I also purchased the little plastic shelf supports from home depot. The individual shelves are 13 inches wide and the sides are 4ft. You can build to suit your needs though, which is the best thing about this shelf. The sides were cut and screwed to the top, the shelf supports put in, and the shelves snapped into place all in about 2 hrs. Beware though... it weighs a ton! I use it to separate my paper by colour. I put my cardstock in with my PP for simplicity. I've had this same system for a long time and it seems to work great!
Total Cost of Shelf: Malamine board (2, 1 with predrilled holes) $30 Shelf supports - $.05 each = $3.00 Total $33 Compare to pre-built cost of $140 - $299 and what's not to like?
My other storage shelf was purchased from Canadian Tire. I no longer have the facilities or the tools to build my own since moving. This shelf is adapatable to your design. There are more vertical and horizontal shelves that I could add, but I like having space for my various baskets. You could also use this model for a paper storage shelf, but since I already have one, took advantage of the shelves other features. The drawers are lovely. In the shallow drawers I have my letter stickers, finished cards, and my embossing powders. In the deep drawers I have my ribbons, flowers, buttons ( yes, I need a whole drawer.. see previous post), and my larger print photo's and photo cd's. I purchased this shelf for approx $150. The assembly was time consuming and a little trying - but since I made Jeff do it there wasn't much frustration on my part!
This is one of my favourite LO's created from a sketch originally done by Penny Hackney over at Scissor's Paper Pen! (There is a link to her blog on the left hand side of Scrap Stash). Her LO was featured in the Blog over at Scrap Witch a few months back. A few of us have had a go at it. Marineland was my first attempt, but I've also tried it in black...
The photo's are 3x3. I think it is just such an effective LO, and so easy! Big thanks to Penny for inspiring me, and a big thanks to Jill over at Scrap Witch for featuring it in her blog so I could find it! If you have a moment, head on over to scrapwitch to check out Penny and Jill's version.
Ok. I'll admit it... I am a self-proclaimed button addict. I love the different shapes, colours, textures... and of course the price! I first discovered buttons on a sketch challenge for Scrap Witch last year (sorry ladies, I can't remember which one). I cut them off of an old shirt (ok, maybe not so old... but I'm sure it wasn't missed...), and was completely happy with the way they worked. I then found a small stash at the dollar store, but quickly graduated to the wide, wonderful world of EBAY. At which time I suffered from temporary insanity and went a little crazy with my bidding ending up with about 10lbs of buttons!
Primarily I use buttons for flower centers (easier and faster than using brads), and sometimes I make the entire flower out of buttons. Lately I've become addicted to using them for borders... even if it is a little over the top sometimes...
This is the sketch challenge for January at Scrap Witch... well, it started out being the sketch challenge anyway... now it resembles ATTACK OF THE BUTTONS. I can't help it, they are so versatile! As an after thought, I wish I had of made my title a little more distinctive, but I like the cut and paste look.
My Christmas cards with North Pole papers.....
-
Last Christmas season I bought the Kaisercraft North Pole 6.5" x 6.5"
paper pad as I really loved the colours of the papers. Of course I really
didn't get...
Sedia Kontak BBM Bergaransi
-
*Sedia Kontak BBM Bergaransi*
Sedia Kontak BBM Bergaransi | Indonesia online store If nearby is still
doubt the accuracy of the fuel Add Contact Services...
Review Zing Lunarang
-
*Best Price Zing Lunarang Reviews*Are you looking the best price for *Zing
Lunarang* and you want to get great deals & best buy this product? Or you
want t...
Website launch!
-
I have a site for my Portrait Art!!!!
PennyHackney.com
A little bit exciting!
I am taking orders for commission work - the order form let's you upload ...
P365: Week 17
-
Saturday 4/28/12: 2nd Dinner. The first one was a big let-down.
Sunday 4/29/12: New cat tree, so hopefully they will be nicer to the dog
and Lucy will...
Merry Christmas...
-
With the silly season in full swing, its Christmas eve and I have 3 days
off to spend some much needed time with my beautiful family.....YAYYYY!!!
So much ...
Little Mim Giveaway!
-
"This doll is 10 inches tall, made with cotton tricot and Hilco knit,
stuffed with carded wool and her hair is a beautifully soft cashmerino
aran. Her h...
HOW LONG????
-
Whats that you say??.........Its been HOW LONG since I last
posted????.....................Thanks to the friends that have given me a
gentle little push ba...


